xv6
初次复制之前的笔记,还未整理,先鸽
xv6-labs-2020
系统调用
-
kernel/syscall.h:定义各系统调用的编号
-
user/user.h:在用户态下声明所有的系统调用函数(新增系统调用时,需要在这里声明才能在程序中调用)、以及一些辅助函数的声明
-
user/usys.pl:系统内核与用户程序的中间体
该脚本文件会在编译期间被执行,生成个汇编文件
usys.S。其对每一个系统调用抽象接口都生成了一个具体的现,叫做entry1
2
3
4
5
6
7
8
9
10
11
12
13
14
15
16
17
18
191 #!/usr/bin/perl -w
2
3 # Generate usys.S, the stubs for syscalls.
4
5 print "# generated by usys.pl - do not edit\n";
6
7 print "#include \"kernel/syscall.h\"\n";
8
9 sub entry {
10 my $name = shift;
11 print ".global $name\n";
12 print "${name}:\n";
13 print " li a7, SYS_${name}\n";
14 print " ecall\n";
15 print " ret\n";
16 }
17
18 entry("fork");
19 entry("exit");- Makefile调用perl脚本user/usys.pl,它生成user/usys.S,即实际的系统调用存根,它使用RISC-V ecall指令转换到内核
li a7, SYS_${name}\n:将系统调用号SYS_${name}(来自kernel/syscall.h)传给RISC-V CPU上的a7寄存器,这样内核就可以过a7寄存器知道现在要处理的是什么系统调用。ecall:特殊指令,用来转入操作系统内核( 关键 指令)。ret:操作系统内核执行完后会返回到这里,执行ret就结束了用户看到系统调用,返回至用户程序。
你可以在编译后阅读user/usys.S,将其与上述脚本对应以便更好地理解。
-
在usys.S中执行ecall进入内核:相应执行uservec、usertrap、usertrapret、userret等函数,实现用户态和内核态的切换以及其中系统调用的实现
-
kernel/sysproc.c:通过一个proc结构体新变量来实现一个新的系统调用,在这里面有所有的与进程有关的系统调用函数,但所有系统调用函数的参数均为空,来自用户空间的参数需要通过argint等函数来实现
-
kernel/syscall.c:各个系统调用的入口。管理各个系统调用,内核中调用系统调用的地方,syscall函数,可以检索来自用户空间的系统调用参数
-
kernel/proc.h:定义寄存器(上下文)、cpu、进程控制块proc、进程状态(属于proc的一部分)、trapframe(属于proc的一部分,用于保存和写入用户空间32个寄存器的值,实现系统调用的参数传递和返回值传递)
-
kernel/proc.c:真正实现对进程的控制的地方,sysproc.c中的系统调用函数最终的实现也需要依靠这里的函数
内存管理
一些函数
PX(level,va):用于获取页号(相对于页表基地址是第几项),va为虚拟地址,level为页表级数pte_t *walk(pagetable_t pagetable, uint64 va, int alloc)- 在指定的页表
pagetable中逐级查找,查找虚拟地址va对应的物理地址,返回对应叶子页表的页表项的地址 - 若alloc非0,则查找过程中可以为不在内存中的页表开辟空间,但无法建立映射,即开辟的空间里面的页表项是空的
- 在指定的页表
int mappages(pagetable_t pagetable, uint64 va, uint64 size, uint64 pa, int perm)- 将基地址为va,大小为size的虚拟空间,映射到基地址为pa,大小为size的物理空间;
- 先调用walk函数,获取页表项的地址,进而根据物理地址填上页表项
- 返回0表示成功,返回-1表示失败
uint64walkaddr(pagetable_t pagetable, uint64 va):在指定的用户页表中找虚拟地址对应的物理地址,如果页表不存在/映射不存在返回 0- kvminit:创建初始内核页表(开辟空间并建立映射)
- kvminthart: 为CPU设置satp寄存器,刷新TLB
void kvmmap(uint64 va, uint64 pa, uint64 sz, int perm)- 对mappages的封装,采用的页表默认为内核页表
uint64 kvmpa(uint64 va):在内核页表中找虚拟地址对应的物理地址,只在为 kstack 找物理地址的时候才需要用,因为其余为直接映射void uvmunmap(pagetable_t pagetable, uint64 va, uint64 npages, int do_free): 解除映射, Remove npages of mappings starting from va. va must be page-aligned(4k对齐). The mappings must exist.- 若do_free不为零则会同时释放页表项指向的空间
pagetable_t uvmcreate():创建一个新的用户页表,即为页表开辟空间;超出内存则返回0void uvminit(pagetable_t pagetable, uchar *src, uint sz):为第一个进程加载页表;uint64 uvmalloc(pagetable_t pagetable, uint64 oldsz, uint64 newsz):对一个增长的进程分配页表项(映射)和物理内存- 如果 newsz >= oldsz,则在 [oldsz, newsz) 区间内开辟内存、创建页表并建立映射。
- Returns new size or 0 on error.
uint64 uvmdealloc(pagetable_t pagetable, uint64 oldsz, uint64 newsz):如果 oldsz > newsz,则将 [newsz, oldsz) 区间内的页表解除映射并释放页表项指向的空间;不需要4k对齐- 返回newsz
void uvmfree(pagetable_t pagetable, uint64 sz):解除映射、释放页表项指向的空间、释放页表本身;int uvmcopy(pagetable_t old, pagetable_t new, uint64 sz):把父进程的页表和页表项指向的物理空间复制给子进程;- 用户虚拟地址空间从0开始
void uvmclear(pagetable_t pagetable, uint64 va):把给一个 PTE 标志为 (对用户态失效),系统调用 exec 用它来设置 guard pages。int copyout(pagetable_t pagetable, uint64 dstva, char *src, uint64 len):- 从内核 copy 给用户地址
- 根据pagetable和dstva查找用户物理地址,从src的复制len个字节到该物理地址
- 成功返回0,失败返回-1
int copyin(pagetable_t pagetable, char *dst, uint64 srcva, uint64 len):从用户地址 copy 进内核- Copy len bytes to dst from virtual address srcva in a given page table.
- Return 0 on success, -1 on error.
int copyinstr(pagetable_t pagetable, char *dst, uint64 srcva, uint64 max):从用户地址 copy 一个字符串进内核- Copy bytes to dst from virtual address srcva in a given page table, until a ‘\0’, or max.
- Return 0 on success, -1 on error.
void freewalk(pagetable_t pagetable): 释放页表本身- Recursively(递归地) free page-table pages.
- All leaf mappings must already have been removed.
内核页表生命周期
为此,我们回顾一下全局内核页表的「生命周期」(这一段在 xv6 book 的 3.3 节有详细阐述):kernel/main.c 中,main 函数首先调用 kvminit() 创建初始全局内核页表(开辟空间+填充初始页表项,除内核栈以外),然后调用 kvminithart() 装载全局内核页表,最后调用 procinit() 为所有 NPROC 个进程开辟内核栈并重新装载。由于全局内核页表是始终存在的,所以没有释放的操作。
- 进程的最大数量为64,一开始便为这64个进程都分配了内核栈(虚拟地址和物理地址)
lab4 (Lab: page tables)实现思路
不要忘了我们的目的:
共享内核页表中,所有物理地址都和与之完全相等的虚拟地址建立映射,也就是直接映射。这是让内核能够直接以物理地址访问内存的数据,不需要使用任何的虚拟地址。
但是 ,由于用户地址的映射并未存储于内核页表,如果我们需要处理用户程序传来的虚拟地址(比如系统调用传入的指针),我们需要先找到用户页表(存于进程控制块中),逐个页表项地找到能够翻译对应虚拟地址的页表项后,才可以获取实际的物理地址并进行访问,这叫做软件模拟翻译。软件模拟翻译的实现很复杂,同时,因为需要复杂的查找,还降低了性能。
所以我们将 用户页表中的内存映射 和 原来共享内核页表中的内存映射 进行合并,这样内核也能够直接对用户的虚拟地址进行访问,而不需要软件模拟翻译。需要注意的是,这是 任务三和任务二一同 需要实现的结果,任务二分离出独立页表,任务三利用独立页表去除软件模拟翻译。
任务2:
-
进程控制块结构体添加:
1
2
pagetable_t k_pagetable;//独立内核页表
uint64 kstack_pa; //内核栈物理地址 -
由于每个进程对应一个独立内核页表,故在allocproc声明进程控制块的同时初始化进程对应的独立内核页表(参考kvminit,但不要映射CLINT,对于kvminit内部的kvmmap,可以声明函数pvmmap替换,不能直接调用kvmmap,因为kvmmap的页表默认为共享内核页表)
由于内核栈是在整个系统加载时分配空间的(只会分配一次,一次性为64个进程分配,每个进程的内核栈对应的虚拟地址就是在这时初始化的),故还需将内核栈的虚拟地址和物理地址映射起来填入独立内核页表(参考mappages和kvmmap,可以使用之前声明的pvmmap)(指导书说,要在procinit中将内核栈物理地址pa拷贝到PCB的成员kstack_pa,其实我不太理解为什么还要有kstack_pa,PCB已经有内核页表k_pagetable和内核虚拟地址kstac了,完全可以据此求出内核栈物理地址kstack_pa)
-
在进程使用前应先将内核空间的根页表的基地址放入SATP寄存器,之前是共享内核页表,只会放一次。而现在我们更改为独立内核页表,则对应页表需要伴随着进程的运行和终止,同步进行独立内核页表的装入和释放
-
在scheduler中进程装入cpu准备运行前参照kvminthart,将独立内核页表基地址载入,当进程执行完时,应将全局页表重新装入。
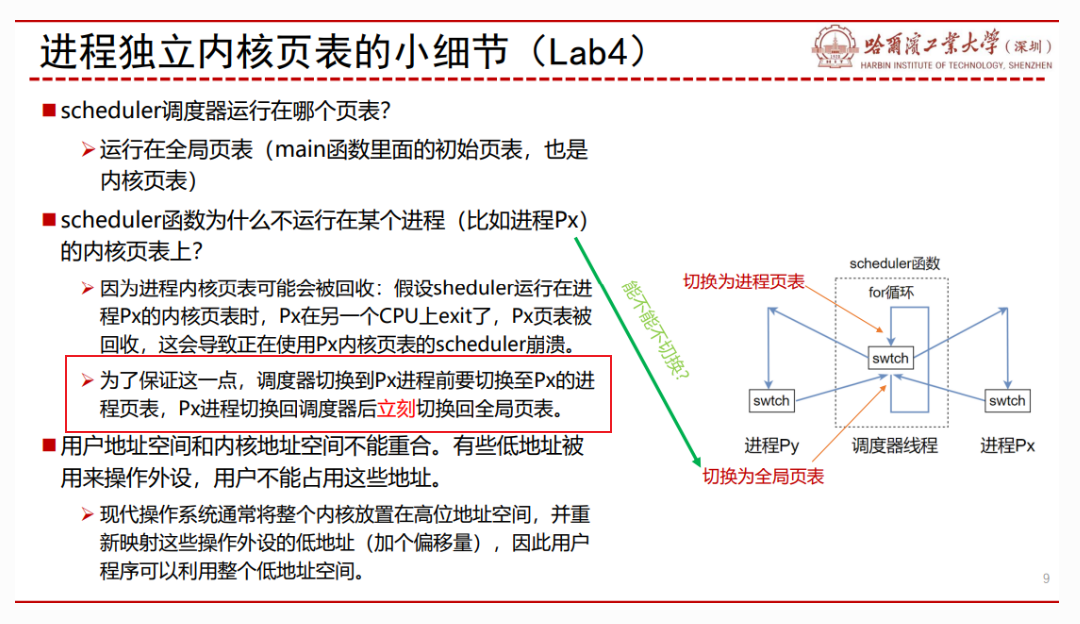
-
在freeproc中释放进程控制块时,也将k_pagetable释放(解除映射,释放页表对应空间,不能释放页表项指向的空间,可以参照freewalk函数进行修改)
-
-
ets:
- vm.c新增函数记得在def.h声明
- 各个内核栈的物理地址和虚拟地址在初始化(procinit)时就已经有了,共享页表的映射也已经建立,而独立页表的映射需要等到进程载入cpu才建立
任务3:
不要忘记目的
xv6目前使用
kernel/vm.c中的copyin()/copyinstr()将用户地址空间的数据拷贝至内核地址空间,它们通过软件模拟翻译的方式获取用户空间地址对应的物理地址,然后进行复制(详情见代码注释)。任务目标:你需要 在独立内核页表加上用户地址空间的映射,同时将函数
copyin()/copyinstr()中的软件模拟地址翻译改成直接访问 ,使得内核能够不必花费大量时间,用软件模拟的方法一步一步遍历页表,而是直接利用硬件用户页表和内核页表合并的一个重要前提:地址不重合:
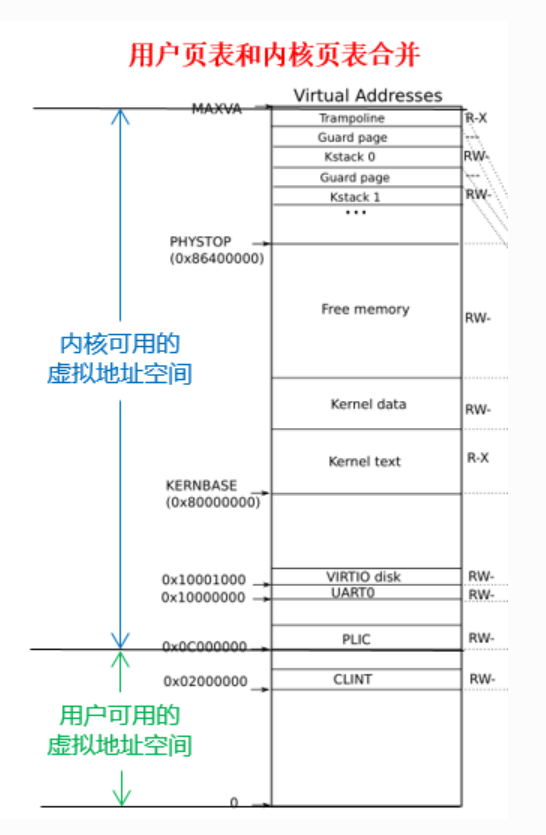
==用户虚拟地址不能超过内核最低的虚拟地址,即 PLIC==
实现步骤与指导书上的差不多:
-
写一个
XXX函数把进程的用户页表映射到内核页表中,同时在defs.h中声明 -
用函数
copyin_new()(在kernel/vmcopyin.c中定义)代替copyin()(在kernel/vm.c中定义)。确保程序 能运行 之后再用copyinstr_new()以代替copyinstr()。- 可以将
copyin_new()和copyinstr_new()在defs.h中声明,然后在copyin()和copyinstr()将代码改为调用对应函数
- 可以将
-
在独立内核页表加上用户页表的映射,以保证刚刚替换的新函数能够使用。注意独立内核页表的用户页表的映射的标志位的选择。标志位User一旦被设置,内核就不能访问该虚拟地址了
-
两种实现方法:
(1)把内核页表中页表项的User位均置为0;
(2)借助RISC-V的
sstatus寄存器,如果该寄存器的SUM位(第18位)置为1,那么内核也可以直接访问上述的虚拟地址。大多情况下,该位需要置0。 -
指导书推荐第二种:在调用copyin_new()/ copyinstr_new()之前修改sstatus寄存器的SUM位:
w_sstatus(r_sstatus() | SSTATUS_SUM);在凋用copyin_new()/ copyinstr_new()之后去掉sstatus寄存器的SUM位:w_sstatus(r_sstatus() & ~SSTATUS_SUM);注意:
SSTATUS_SUM需在riscv.h中声明:#define SSTATUS_SUM (1L << 18) // Allow kernel to visit user's vitual address
-
-
在fork()、exec()和growproc()这三个函数里将改变后的进程页表同步到内核页表中。
- fork:将父进程的页表复制一份给子进程,子进程的用户页表也要复制并形成独立内核页表
- exec:exec 和 fork 函数不同,exec 的函数原型是
exec(BIN, argv...)。exec 并不额外创建进程,
而是在当前进程中直接执行对应的命令和函数。那么就要替换进程的内容。其中最重要的,就是替换新的地址空间及内容,用户页表改变,此时独立内核页表需要同步改变 - growproc:随着进程的进行,有的函数执行完毕或者有新的函数执行,此时用户空间会随之增加或减少,用户页表改变,此时独立内核页表需要同步改变(解除映射但不释放页表项指向的空间)
-
第一个进程也需要将用户页表映射到内核页表中,见kernel/proc.c: userinit()
Lab traps
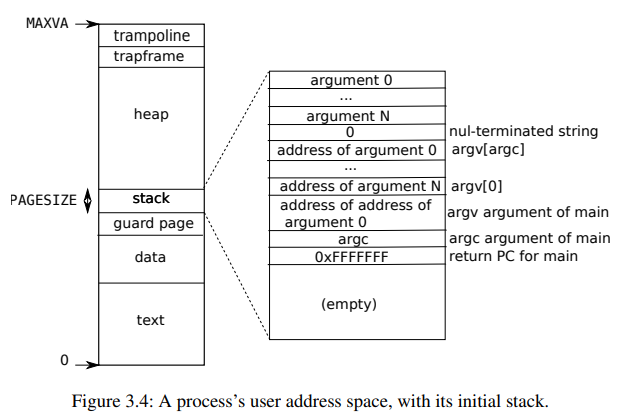
- Which registers contain arguments to functions? For example, which register holds 13 in main’s call to
printf?- 由
li a2,13和li a1,12可知,a1和a2寄存器包含了传递给函数的参数,其中a2寄存器含有main函数传递给printf函数的参数13
- 由
- Where is the call to function
fin the assembly code for main? Where is the call tog? (Hint: the compiler may inline functions.)- 汇编程序中没有直接调用函数
f的代码,由li a1,12可知函数f(8)+1的结果直接被计算出来了,说明编译器进行了内联;同时函数g的代码和f一样,说明也进行了内联
- 汇编程序中没有直接调用函数
- At what address is the function
printflocated?- 由指令
jalr 1528(ra) # 628 <printf>可知,函数printf的地址为0x628(和之前不太一样?之前是630)
- 由指令
- What value is in the register
rajust after thejalrtoprintfinmain?jalr会将 pc+4 存储给指定的寄存器 ra,所以 ra=0x38。
- Run the following code.
1 | |
What is the output? Here’s an ASCII table that maps bytes to characters.
The output depends on that fact that the RISC-V is little-endian. If the RISC-V were instead big-endian what would you set i to in order to yield the same output? Would you need to change 57616 to a different value?
Here’s a description of little- and big-endian and a more whimsical description.
输出为He110 World,%x表示以十六进制进行输出,57616对应的16进制为e110,结合前面的H便形成He110;在ASCALL码中0x64对应d,0x6d对应l,0x72对应r,由于RIAC-V采用的是小端对齐,所以会依次读出0x72(r)、0x6d(l)、0x64(d),结合前面的Wo形成World
如果采用大端对齐,57616不用改变,0x00646c72需改为0x726c6400
- In the following code, what is going to be printed after
'y='? (note: the answer is not a specific value.) Why does this happen?
1 | |
y对应的是寄存器a2的值,由于没有提前给a2赋值,所以这个值是不确定的
backtrace
Alarm
(1)
在本练习中,您将向 xv6添加一个特性,该特性会在进程使用 CPU 时间时定期发出警报。这对于希望限制占用 CPU 时间的计算绑定进程或希望进行计算但也希望采取某些周期性操作的进程可能很有用。更一般地说,您将实现用户级中断/错误处理程序的基本形式; 例如,您可以使用类似的东西来处理应用程序中的页面错误。如果您的解决方案通过了警报测试和用户测试,那么它就是正确的。
您应该添加一个新的信号警报(间隔、处理程序)系统调用。如果应用程序调用 sigAlarm (n,fn) ,那么在程序消耗的每 n 个 CPU 时间之后,内核应该调用应用程序函数 fn。当 fn 返回时,应用程序应该从停止的地方恢复。在 xv6中,clock是一个相当任意的时间单位,由硬件计时器生成中断的频率决定。如果一个应用程序调用 sigAlarm (0,0) ,内核应该停止生成周期性的警报调用。
(2)
在完成test0之后,其实忽略了一个重要的问题,报出alarm之后,应该恢复上下文寄存器,继续执行时钟中断前的指令
实现方法:
- 可以在满足ticks数后,在usertrap将整个p->trapframe保存起来(在proc中添加成员save_trapframe);
- 执行系统调用sigreturn时再进行恢复trapframe;同时释放save_trapframe
- 注意:为了防止重复进入handler,需要在usertrap进行操作前判断save_trapframe是否为0,若不是则说明有handle函数正在执行
Lab Lazy
O/S 可以对页表硬件使用的许多巧妙技巧之一是用户空间堆内存的惰性分配。Xv6应用程序使用 sbrk ()系统调用请求内核提供堆内存。在我们提供的内核中,sbrk ()分配物理内存并将其映射到进程的虚拟地址空间。内核为大型请求分配和映射内存可能需要很长时间。例如,假设一个 GB 包含262,144个4096字节的页面; 这是一个巨大的分配数量,即使每个页面都很小。此外,有些程序分配的内存比实际使用的要多(例如,实现稀疏数组) ,或者在使用之前很早就分配了内存。为了让 sbrk ()在这种情况下能够更快地完成,复杂的内核会延迟地分配用户内存。也就是说,sbrk ()不分配物理内存,只是记住分配了哪些用户地址,并在用户页表中将这些地址标记为无效。当进程首次尝试使用任何给定的延迟分配内存页面时,CPU 会生成一个页面错误,内核通过分配物理内存、对其用0填充并映射来处理该错误。您将在这个实验中向 xv6添加这个惰性分配特性。
1. Eliminate allocation from sbrk() (easy)
消除来自sbrk()的分配
Your first task is to delete page allocation from the sbrk(n) system call implementation, which is the function sys_sbrk() in sysproc.c. The sbrk(n) system call grows the process’s memory size by n bytes, and then returns the start of the newly allocated region (i.e., the old size). Your new sbrk(n) should just increment the process’s size (myproc()->sz) by n and return the old size. It should not allocate memory – so you should delete the call to growproc() (but you still need to increase the process’s size!).
简单说,就是sys_sbrk()函数中只声明大小,而不实际分配空间
2. Lazy allocation (moderate)
Modify the code in trap.c to respond to a page fault from user space by mapping a newly-allocated page of physical memory at the faulting address, and then returning back to user space to let the process continue executing. You should add your code just before the printf call that produced the “usertrap(): …” message. Modify whatever other xv6 kernel code you need to in order to get echo hi to work.
Here are some hints:
- You can check whether a fault is a page fault by seeing if r_scause() is 13 or 15 in usertrap().
r_stval()returns the RISC-Vstvalregister, which contains the virtual address that caused the page fault.- Steal code from uvmalloc() in vm.c, which is what sbrk() calls (via growproc()). You’ll need to call kalloc() and mappages().
- Use PGROUNDDOWN(va) to round the faulting virtual address down to a page boundary.
- uvmunmap() will panic; modify it to not panic if some pages aren’t mapped.
- 还需要更改 uvmunmap 的内容,这是因为加入懒分配之后,uvmunmap 可能会被要求解除本就不存在的映射、或者去找还没有创建的 pte。在原本的写法中这样会 panic,因此,我们要把 panic 改掉
If all goes well, your lazy allocation code should result in echo hi working. You should get at least one page fault (and thus lazy allocation), and perhaps two.
3. Lazytests and Usertests (moderate)
完成2之后任务远没完成
We’ve supplied you with lazytests, an xv6 user program that tests some specific situations that may stress your lazy memory allocator. Modify your kernel code so that all of both lazytests and usertests pass.
- Handle negative sbrk() arguments. (处理负的sbrk()参数)
- 解除映射(参照growproc())
- Kill a process if it page-faults on a virtual memory address higher than any allocated with sbrk().(如果缺页错误的虚拟地址高于任何sbrk()分配的内存地址,则杀死进程)
- va需要小于p->sz
- Handle the parent-to-child memory copy in fork() correctly.(在fork()中正确处理父进程到子进程的内存复制)
- Handle the case in which a process passes a valid address from sbrk() to a system call such as read or write, but the memory for that address has not yet been allocated.(系统调用时,地址有效,但内存还没被分配)
- trap发生的三种情况:系统调用、中断、异常;在惰性分配中,我们目前只考虑了缺页异常的情况,并在缺页时分配空间,但是,系统调用时也可能遇到未分配空间的情况,故也需要在系统调用时考虑内存是否已分配,若未分配,则需同之前一样进行分配空间。
uint64 walkaddr(pagetable_t pagetable, uint64 va):在指定的用户页表中找虚拟地址对应的物理地址,如果页表不存在/映射不存在返回 0
- Handle out-of-memory correctly: if kalloc() fails in the page fault handler, kill the current process.(正常处理内存溢出情况:kalloc()失败,则杀死当前进程)
- Handle faults on the invalid page below the user stack.(处理缺页错误中访问用户栈下的非法空间)
- va必须大于p->trapframe->sp(如下)
- 实际上,在本次实验中,我们关注的是heap的惰性分配,这也是为什么在上面第3点要求中,不能直接在fork内将uvmcopy给注释掉
Lab COW
虚拟内存提供了一定程度的间接性: 内核可以通过将 PTE 标记为无效或只读来拦截内存引用,从而导致页错误,并且可以通过修改 PTE 来更改地址的含义。在计算机系统中有这样一种说法: 任何系统问题都可以通过一定程度的间接来解决。惰性分配实验提供了一个例子。本次实验中我们尝试另一个例子: copy-on write fork
problem
Xv6中的 fork ()系统调用将父进程的所有用户空间内存复制到子进程中。如果父进程很大,复制可能需要很长时间。更糟糕的是,这些工作通常被大量浪费; 例如,子代中的 fork ()后跟 exec ()将导致子代丢弃复制的内存,而且可能从未使用过大部分内存。另一方面,如果父级和子级都使用一个页面,并且其中一个或两个都写入该页面,则确实需要一个副本。
写时复制(copy-on-write,COW) fork ()的目标是将分配和复制子内存页的时间推迟到实际需要复制的时候(如果需要的话)。
COW fork ()只为子级创建一个页表,用于用户内存的 PTE 指向父级的物理页面。COW fork ()将父级和子级中的所有用户 PTE 都标记为不可写。当任何一个进程尝试编写这些 COW 页面中的一个时,CPU 将强制出现页面错误。内核页面错误处理程序检测到这种情况,为错误进程分配一个物理内存页面,将原始页面复制到新页面,并在错误进程中修改相关的 PTE 以引用新页面,这一次 PTE 标记为可写。当页面错误处理程序返回时,用户进程将能够编写这个复制过来的页面。
COW fork ()使得释放实现用户内存的物理页变得有点棘手。给定的物理页可以由多个进程的页表引用,并且只有在最后一个引用消失时才应该释放。
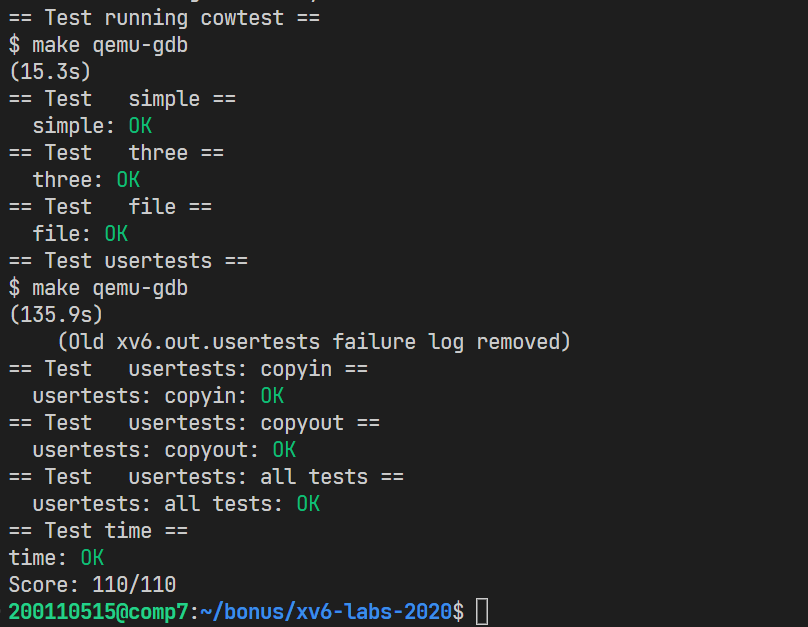
test
To help you test your implementation, we’ve provided an xv6 program called cowtest (source in user/cowtest.c). cowtest runs various tests, but even the first will fail on unmodified xv6. Thus, initially, you will see:
1 | |
The “simple” test allocates ==more than half of available physical memory==, and then fork()s. The fork fails because there is not enough free physical memory to give the child a complete copy of the parent’s memory.
When you are done, your kernel should pass all the tests in both cowtest and usertests. That is:
1 | |
Implement copy-on write(hard)
Here’s a reasonable plan of attack.
-
Modify uvmcopy() to map the parent’s physical pages into the child, instead of allocating new pages. Clear
PTE_Win the PTEs of both child and parent. -
Modify usertrap() to recognize page faults. When a page-fault occurs on a COW page, allocate a new page with kalloc(), copy the old page to the new page, and install the new page in the PTE with
PTE_Wset.- 分配物理页
- 复制内容, 更新页表项
- 修改PTE_W和PTE_COW,释放原本的pa
-
Ensure that each physical page is freed when the last PTE reference to it goes away – but not before. A good way to do this is to keep, for each physical page, a “reference count” of the number of user page tables that refer to that page. Set a page’s reference count to one when
kalloc()allocates it. Increment a page’s reference count when fork causes a child to share the page, and decrement a page’s count each time any process drops the page from its page table.kfree()should only place a page back on the free list if its reference count is zero. It’s OK to to keep these counts in a fixed-size array of integers. You’ll have to work out a scheme for how to index the array and how to choose its size. For example, you could index the array with the page’s physical address divided by 4096, and give the array a number of elements equal to highest physical address of any page placed on the free list bykinit()in kalloc.c.- 为了判断何时回收物理页,需要一个应用计数(以下用count表示),当kalloc()时,count置一;当fork时,count++;当页面从页表销毁时,count–;只有count=0,kfree()才将页面放到空闲链表中
- 例如,您可以使用页面的物理地址除以4096来索引数组,并在 kalloc.c 中通过 kinit ()初始化数组
- xv6中内核物理内存占用区间:KERNBASE 指的是物理内存的起始地址, PHYSTOP 是 xv6 的物理内存终止地址
-
Modify copyout() to use the same scheme as page faults when it encounters a COW page.
Some hints:
-
The lazy page allocation lab has likely made you familiar with much of the xv6 kernel code that’s relevant for copy-on-write. However, you should not base this lab on your lazy allocation solution; instead, please start with a fresh copy of xv6 as directed above.
-
It may be useful to have a way to record, for each PTE, whether it is a COW mapping. You can use the RSW (reserved for software) bits in the RISC-V PTE for this.
- 使用 RISC-V PTE 中的 RSW(保留位)来标志PTE是否为COW映射

-
usertestsexplores scenarios thatcowtestdoes not test, so don’t forget to check that all tests pass for both. -
Some helpful macros and definitions for page table flags are at the end of
kernel/riscv.h. -
If a COW page fault occurs and there’s no free memory, the process should be killed.
-
etc:两个大坑,耗费了我很长时间,严重怀疑自己
-
在cow分配页面后记得修改pte
-
我们只需对写页面错误进行处理,即在trap中只需判断
r_scause() == 15,而无需判断是否等于13(这与lazy allocation不同,不要画蛇添足),虽然关系不大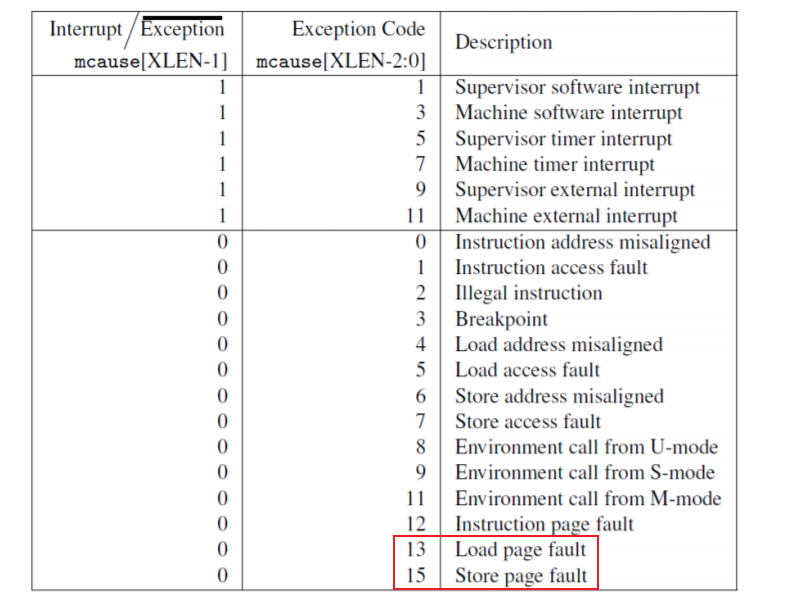
-
在用锁的时候要特别特别注意。出现一些玄学操作往往都是锁的问题
-
Lab: Multithreading
In this exercise you will design the context switch mechanism for a user-level threading system, and then implement it. To get you started, your xv6 has two files user/uthread.c and user/uthread_switch.S, and a rule in the Makefile to build a uthread program. uthread.c contains most of a user-level threading package, and code for three simple test threads. The threading package is missing some of the code to create a thread and to switch between threads.
简单说,就是实现用户级多线程,提出一个创建线程和保存/恢复寄存器的方法,以便在线程之间切换
1. Uthread: switching between threads (moderate)
基本上就是仿照内核中的上下文切换
- 和内核中进程调度一样,定义一个context,包含ra、sp、和各种被调用者需要保存的寄存器
- 将kernel/swtch.S的内容复制到user/uthread_switch.S
- 在thread_schefule()中调用uthread_switch进行上下文切换,从而实现线程切换
- 在thread_create()中将传入的函数指针赋值给ra,这样就可以在进程被调度时执行指定函数。把栈指针赋值到sp,由于栈空间是从大到小的,所以赋值的应该是栈的末尾指针
2. Using threads (moderate)
-
问题:The file
notxv6/ph.ccontains a simple hash table that is correct if used from a single thread, but incorrect when used from multiple threads -
编译和运行:这里用的不是xv6,而是远程平台上的gcc
-
$ make ph $ ./ph 1 # 数字表示线程数1
2
3
4
5
6
7
8
- 简单来说就是多线程读写出现不同步,需要利用UNIX pthread的线程库加锁
- ```c
pthread_mutex_t lock; // declare a lock
pthread_mutex_init(&lock, NULL); // initialize the lock
pthread_mutex_lock(&lock); // acquire lock
pthread_mutex_unlock(&lock); // release lock
-
-
哈希桶:There are situations where concurrent
put()s have no overlap(重叠) in the memory they read or write in the hash table, and thus don’t need a lock to protect against each other. Can you changeph.cto take advantage of such situations to obtain parallel speedup for someput()s?==Hint: how about a lock per hash bucket?==
3. Barrier(moderate)
-
问题:将所有线程堵到一个点,我们期望所有线程都调用了 barrier() 之后才能继续执行。:In this assignment you’ll implement a barrier: a point in an application at which all participating threads must wait until all other participating threads reach that point too. You’ll use pthread condition variables, which are a sequence coordination technique similar to xv6’s sleep and wakeup.
-
编译和运行:同2
-
更多线程库接口
-
pthread_cond_wait(&cond, &mutex); // go to sleep on cond, releasing lock mutex, acquiring upon wake up // wait 中进入后release lock mutex,出来前acquire lock mutex的原因就是,要保证该进程可被唤醒 pthread_cond_broadcast(&cond); // wake up every thread sleeping on cond1
2
3
4
5
6
7
8
9
10
11
12
13
14
15
16
17
18
19
20
21
22
23
24
25
26
27
28
29
30
31
32
33
34
35
36
37
38
39
40
41
42
43
44
45
46
47
48
49
50
51
52
53
54
55
56
57
58
59
60
61
62
63
- There are two issues that complicate your task:
- You have to deal with a succession of barrier calls, each of which we'll call a round. `bstate.round` records the current round. You should increment `bstate.round` each time all threads have reached the barrier.(所有进程到达barrier时,增加round)
- You have to handle the case in which one thread races around the loop before the others have exited the barrier. In particular, you are re-using the `bstate.nthread` variable from one round to the next. Make sure that a thread that leaves the barrier and races around the loop doesn't increase `bstate.nthread` while a previous round is still using it.(barrier.nthread要记得更新)
## Lab fs
### 前置知识:
- log
- xv6 通过简单的日志系统来解决文件操作过程当中崩溃所导致的问题。一个系统调用并不直接导致对磁盘上文件系统的写操作,相反,他会把一个对磁盘写操作的描述包装成一个日志写在磁盘中。当系统调用把所有的写操作都写入了日志,它就会写一个特殊的提交记录到磁盘上,代表一次完整的操作。从那时起,系统调用就会把日志中的数据写入磁盘文件系统的数据结构中。在那些写操作都成功完成后,系统调用就会删除磁盘上的日志文件。
为什么日志可以解决文件系统操作中出现的崩溃呢?如果崩溃发生在操作提交之前,那么磁盘上的日志文件就不会被标记为已完成,恢复系统的代码就会忽视它,磁盘的状态正如这个操作从未执行过一样。如果是在操作提交之后崩溃的,恢复程序会重演所有的写操作,可能会重复之前已经进行了的对磁盘文件系统的写操作。==在任何一种情况下,日志文件都使得磁盘操作对于系统崩溃来说是原子操作:在恢复之后,要么所有的写操作都完成了,要么一个写操作都没有完成。==
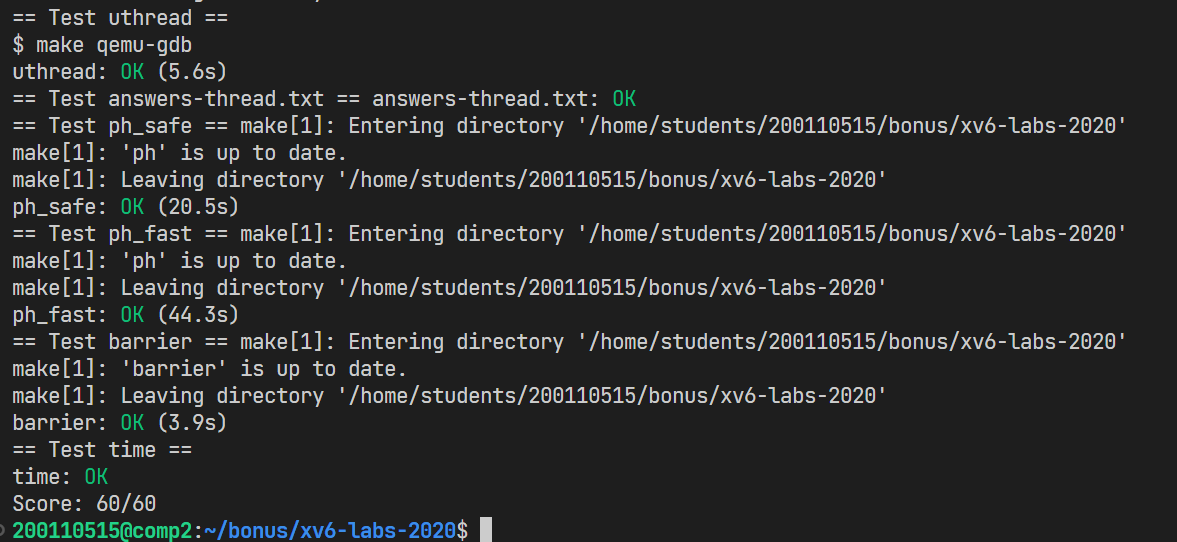
- 组成log 分为头快和log块,头快包含各log块的信息
- inode
- 
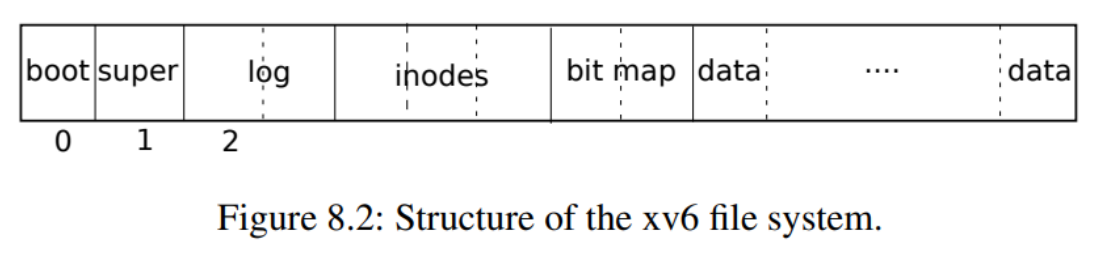
存在直接索引和一级索引。inode结构体中的addr有13个元素(包含12个直接索引和一个简介所以)
- [操作inode](#操作inode的过程)
- 目录:
- 目录项dirent:包含一个名称`name`和一个inode编号`inum`,inode编号为零的条目是空的。
- 函数`dirlookup`(***kernel/fs.c\***:527)`struct inode* dirlookup(struct inode *dp, char *name, uint *poff)`
在目录中搜索具有给定名称的条目。如果找到一个,它将返回一个指向相应inode的指针,解开锁定,并将`*poff`设置为目录中条目的字节偏移量,以满足调用方希望对其进行编辑的情形。
- 函数`dirlink`(***kernel/fs.c\***:554)`dirlink(struct inode *dp, char *name, uint inum)`
将给定名称和inode编号的新目录条目写入目录`dp`
- 文件
- 三种类型:管道、inode、设备
- 系统中所有打开的文件都保存在全局文件表`ftable`中
- 读取和写入偏移量以原子方式更新(上锁之后写入之前更新文件偏移量),因此,对同一文件的同时多次写入不能覆盖彼此的数据,尽管他们的写入最终可能是交错的
### 1. Large files ([moderate](https://pdos.csail.mit.edu/6.828/2020/labs/guidance.html))
- 问题:In this assignment you'll increase the maximum size of an xv6 file. Currently xv6 files are limited to 268 blocks, or 268*BSIZE bytes (BSIZE is 1024 in xv6). This limit comes from the fact that an xv6 inode contains 12 "direct" block numbers and one "singly-indirect" block number, which refers to a block that holds up to 256 more block numbers, for a total of 12+256=268 blocks.(原本直接索引+间接索引只有268块,现在要增加)
- 任务:You'll change the xv6 file system code to support a "doubly-indirect" block in each inode, containing 256 addresses of singly-indirect blocks, each of which can contain up to 256 addresses of data blocks. The result will be that a file will be able to consist of up to 65803 blocks, or 256*256+256+11 blocks (11 instead of 12, because we will sacrifice one of the direct block numbers for the double-indirect block). (原本是直接索引+间接索引;现在改为直接索引+一级索引+二级索引)
大小变为:256*256+256+11=65803块
- mkfs
The `mkfs` program creates the xv6 file system disk image and determines how many total blocks the file system has; this size is controlled by `FSSIZE` in `kernel/param.h`. You'll see that `FSSIZE` in the repository for this lab is set to 200,000 blocks. You should see the following output from `mkfs/mkfs` in the make output:
```sh
nmeta 70 (boot, super, log blocks 30 inode blocks 13, bitmap blocks 25) blocks 199930 total 200000
这一行描述了 mkfs/mkfs 构建的文件系统: 它有70个元数据块(用于描述文件系统的块)和199,930个数据块,总共200,000个块。如果在实验中的任何时候,您发现自己必须从头重新构建文件系统,那么可以运行 make clean 命令来重新构建 fs.img。
-
-
Hints
- Make sure you understand
bmap(). Write out a diagram of the relationships betweenip->addrs[], the indirect block, the doubly-indirect block and the singly-indirect blocks it points to, and data blocks. Make sure you understand why adding a doubly-indirect block increases the maximum file size by 256*256 blocks (really -1, since you have to decrease the number of direct blocks by one). - Think about how you’ll index the doubly-indirect block, and the indirect blocks it points to, with the logical block number.
- If you change the definition of
NDIRECT, you’ll probably have to change the declaration ofaddrs[]instruct inodeinfile.h. Make sure thatstruct inodeandstruct dinodehave the same number of elements in theiraddrs[]arrays. - If you change the definition of
NDIRECT, make sure to create a newfs.img, sincemkfsusesNDIRECTto build the file system. - If your file system gets into a bad state, perhaps by crashing, delete
fs.img(do this from Unix, not xv6).makewill build a new clean file system image for you. - Don’t forget to
brelse()each block that youbread(). - You should allocate indirect blocks and doubly-indirect blocks only as needed, like the original
bmap(). - Make sure
itruncfrees all blocks of a file, including double-indirect blocks.
- Make sure you understand
-
步骤:
- 修改NDIRECT为11,并相应修改dinode和inode结构体
- 修改一个文件的最多块数:MAXFILE
- 修改bmap和itrunc
2. Symbolic links (moderate)
-
问题:在本练习中,您将向 xv6添加符号链接。符号链接(或软链接)通过路径名称引用链接文件; 当打开一个符号链接时,内核会跟随指向引用文件的链接。符号链接类似于硬链接,但硬链接仅限于指向同一磁盘上的文件,而符号链接可以跨磁盘设备。尽管 xv6不支持多个设备,但是实现这个系统调用是了解路径名查找如何工作的一个很好的练习。
-
任务:You will implement the
symlink(char *target, char *path)system call, which creates a new symbolic link at path that refers to file named by target. For further information, see the man page symlink. To test, add symlinktest to the Makefile and run it. Your solution is complete when the tests produce the following output (including usertests succeeding). -
hints:
- First, create a new system call number for symlink, add an entry to user/usys.pl, user/user.h, and implement an empty sys_symlink in kernel/sysfile.c.
- Add a new file type (
T_SYMLINK) to kernel/stat.h to represent a symbolic link. - Add a new flag to kernel/fcntl.h, (
O_NOFOLLOW), that can be used with theopensystem call. Note that flags passed toopenare combined using a bitwise OR operator, so your new flag should not overlap with any existing flags. This will let you compile user/symlinktest.c once you add it to the Makefile. - Implement the
symlink(target, path)system call to create a new symbolic link at path that refers to target. Note that target does not need to exist for the system call to succeed. You will need to choose somewhere to store the target path of a symbolic link, for example, in the inode’s data blocks.symlinkshould return an integer representing success (0) or failure (-1) similar tolinkandunlink. - Modify the
opensystem call to handle the case where the path refers to a symbolic link. If the file does not exist,openmust fail. When a process specifiesO_NOFOLLOWin the flags toopen,openshould open the symlink (and not follow the symbolic link). - If the linked file is also a symbolic link, you must recursively follow it until a non-link file is reached. If the links form a cycle, you must return an error code. You may approximate this by returning an error code if the depth of links reaches some threshold (e.g., 10).
- Other system calls (e.g., link and unlink) must not follow symbolic links; these system calls operate on the symbolic link itself.
- You do not have to handle symbolic links to directories for this lab.
-
其实只需要修改sys_open和sys_symlink函数,注意事项hints已列出,其余在代码中也有注释
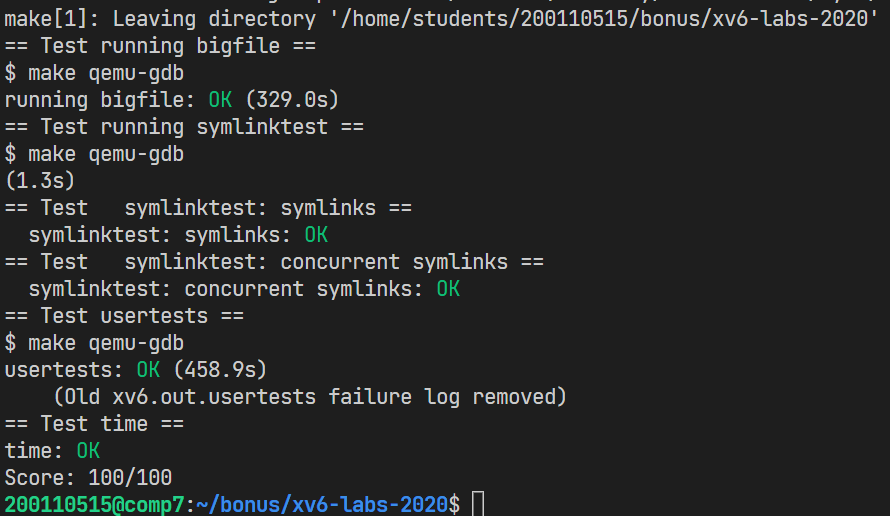
3. make grade
- 注意make grade的bigfile测试会很慢,如果qemu里能通过但make grade时timeout,记得修改grade-lab-fs的timeout参数
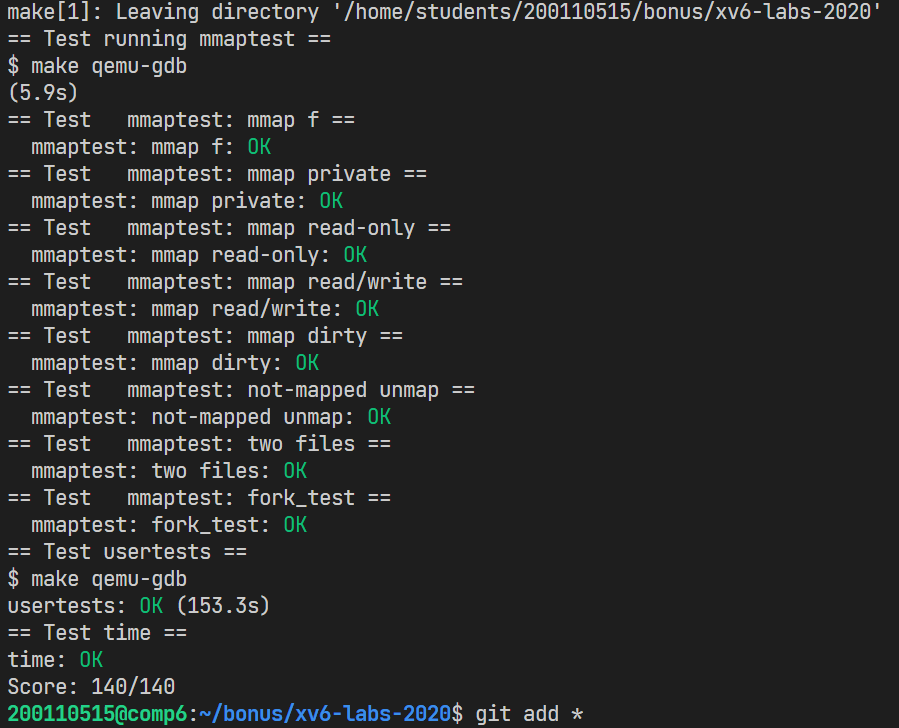
Lab Mmap
-
问题:Mmap 和 munmap 系统调用允许 UNIX 程序对其地址空间进行详细的控制。它们可以用来在进程之间共享内存,将文件映射到进程地址空间,以及作为用户级页面错误方案的一部分,如本课讨论的垃圾收集算法。在这个实验中,您将向 xv6添加 mmap 和 munmap,重点是内存映射文件。
- mmap()系统调用使得进程之间通过映射同一个普通文件实现共享内存。普通文件被映射到进程地址空间后,进程可以像访问普通内存一样对文件进行访问,不必再调用read(),write()等操作。Mmap
-
任务:实现mmap和munmap两个系统调用:
-
mmap()系统调用:
void* mmap ( void *addr, int length, int prot , int flags, int fd, int offset )参数fd为即将映射到进程空间的文件描述字,一般由open()返回。length是映射到调用进程地址空间的字节数,它从被映射文件开头offset个字节开始算起(本次实验可假设为0)。prot 参数指定共享内存的访问权限。可取如下几个值的或:PROT_READ(可读) , PROT_WRITE (可写), (PROT_EXEC (可执行), PROT_NONE(不可访问))。flags由以下几个常值指定:MAP_SHARED , MAP_PRIVATE,其中,MAP_SHARED , MAP_PRIVATE必选其一。offset参数一般设为0(本实验假设为0),表示从文件头开始映射。参数addr指定文件应被映射到进程空间的起始地址,一般被指定一个空指针,此时选择起始地址的任务留给内核来完成。函数的返回值为最后文件映射到进程空间的地址,进程可直接操作起始地址为该值的有效地址。(失败则返回0xffffffffffffffff )
-
系统调用munmap():
int munmap( void * addr, int length )该调用在进程地址空间中解除一个映射关系,addr是调用mmap()时返回的地址,length是映射区的大小。当映射关系解除后,对原来映射地址的访问将导致段错误发生。如果进程修改了内存并映射了 MAP _ SHARED,那么修改应该首先写到文件中。Munmap 调用可能只覆盖 mmap-ed 区域的一部分,但是您可以假定它将在开始、结束或整个区域取消映射(但是不会在区域的中间打一个洞)。
-
-
hints
-
Start by adding
_mmaptesttoUPROGS, andmmapandmunmapsystem calls, in order to getuser/mmaptest.cto compile. For now, just return errors frommmapandmunmap. We definedPROT_READetc for you inkernel/fcntl.h. Runmmaptest, which will fail at the first mmap call.(配置好mmaptest.c,和mmap、munmap系统调用) -
Fill in the page table lazily, in response to page faults. That is,
mmapshould not allocate physical memory or read the file. Instead, do that in page fault handling code in (or called by)usertrap, as in the lazy page allocation lab. The reason to be lazy is to ensure thatmmapof a large file is fast, and thatmmapof a file larger than physical memory is possible.(和lazy的实验一样,采用惰性分配) -
Keep track of what
mmaphas mapped for each process. Define a structure corresponding to the VMA (virtual memory area) described in Lecture 15, recording the address, length, permissions, file, etc. for a virtual memory range created bymmap. Since the xv6 kernel doesn’t have a memory allocator in the kernel, it’s OK to declare a fixed-size array of VMAs and allocate from that array as needed. A size of 16 should be sufficient.(跟踪 mmap 为每个进程映射的内容。定义一个与VMA (虚拟内存区域)相对应的结构,记录 mmap 创建的虚拟内存范围的地址、长度、权限、文件等。数组长度可设为16) -
Implement
mmap: find an unused region in the process’s address space in which to map the file, and add a VMA to the process’s table of mapped regions. The VMA should contain a pointer to astruct filefor the file being mapped;mmapshould increase the file’s reference count so that the structure doesn’t disappear when the file is closed (hint: seefiledup). Runmmaptest: the firstmmapshould succeed, but the first access to the mmap-ed memory will cause a page fault and killmmaptest. -
Add code to cause a page-fault in a mmap-ed region to allocate a page of physical memory, read 4096 bytes of the relevant file into that page, and map it into the user address space. Read the file with
readi, which takes an offset argument at which to read in the file (but you will have to lock/unlock the inode passed toreadi). Don’t forget to set the permissions correctly on the page. Runmmaptest; it should get to the firstmunmap.添加代码以导致 mmap-ed 区域中的页错误,从而分配一页物理内存,将相关文件的4096字节读入该页,并将其映射到用户地址空间。使用 readi 读取文件,它接受一个要读入文件的偏移量参数(但是您必须锁定/解锁传递给 readi 的 inode)。不要忘记正确设置页面上的权限。运行 mmaptest; 它应该到达第一个 munmap。
-
Implement
munmap: find the VMA for the address range and unmap the specified pages (hint: useuvmunmap). Ifmunmapremoves all pages of a previousmmap, it should decrement the reference count of the correspondingstruct file. If an unmapped page has been modified and the file is mappedMAP_SHARED, write the page back to the file. Look atfilewritefor inspiration.实现 munmap: 找到地址范围的 VMA 并取消映射指定的页面(提示: 使用 uvmunmap)。如果 munmap 删除了一个 mmap 的所有页面,那么它应该递减相应结构文件的引用计数。如果一个未映射的页面已被修改,并且该文件已被映射为 MAP _ SHARED,则将该页面写回该文件。从filewrite中寻找灵感。
-
Ideally your implementation would only write back
MAP_SHAREDpages that the program actually modified. The dirty bit (D) in the RISC-V PTE indicates whether a page has been written. However,mmaptestdoes not check that non-dirty pages are not written back; thus you can get away with writing pages back without looking atDbits.理想情况下,您的实现将只写回程序实际修改过的 MAP _ SHARED 页面。RISC-V PTE 中的脏位(D)表示页是否已被写入。然而,mmaptest 不检查非脏页面是否没有被写回; 因此您可以不查看 D 位就可以写回页面。
-
Modify
exitto unmap the process’s mapped regions as ifmunmaphad been called. Runmmaptest;mmap_testshould pass, but probably notfork_test.exit时,取消一个进程所有vma的所有区域的映射
-
Modify
forkto ensure that the child has the same mapped regions as the parent. Don’t forget to increment the reference count for a VMA’sstruct file. In the page fault handler of the child, it is OK to allocate a new physical page instead of sharing a page with the parent. The latter would be cooler, but it would require more implementation work. Runmmaptest; it should pass bothmmap_testandfork_test.为子进程同步父进程所有vma的所有区域的映射, 类似mmap,同时注意文件引用计数
-
-
步骤:
- 配置好mmaptest.c,和mmap、munmap系统调用
- 声明结构体VMA,以其为元素声明长度为16的数组,在进程控制块增加p->curmax用于记录最高空间地址;p->vmalist用于记录该进程中对mmap的各条记录
- 创建辅助函数
- initvma
- allocvma
- deallocvma
- 完成mmap系统调用:
- 由于惰性分配,处理页面错误
- 完成munmap系统调用:
- 完成fork中子进程同步父进程的vma(注意文件引用计数)
- 完成exit中vma解除映射(注意文件引用计数)
-
Book
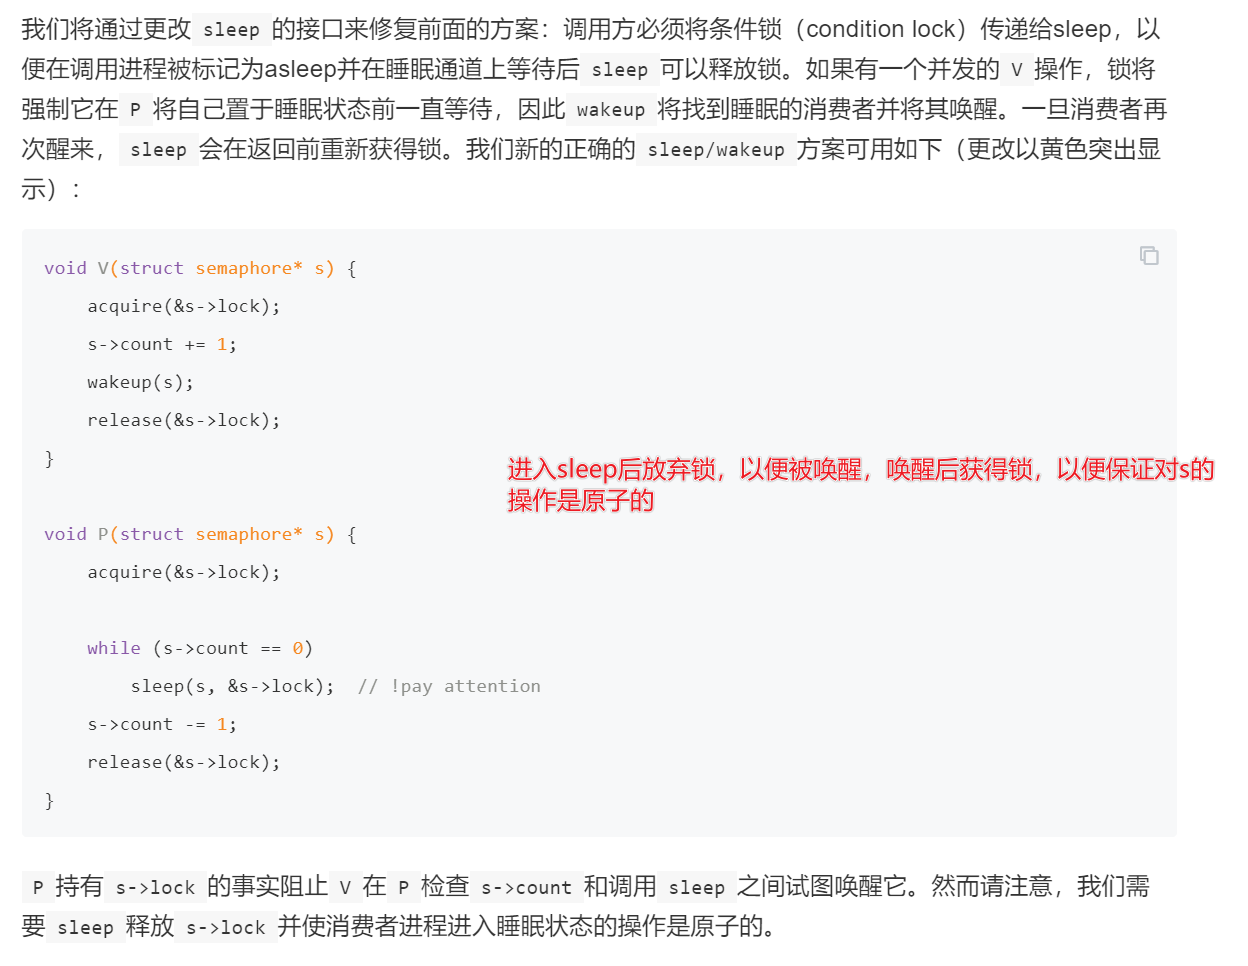
调度的一部分总结(sleep and wakeup)
操作inode的过程
- ip = iget(dev, inum)
- 获取内存inode,引用次数加1,此时inode可能还未从磁盘读取。(多个进程可以持有指向
iget返回的inode的C指针,但一次只能有一个进程锁定inode)
- 获取内存inode,引用次数加1,此时inode可能还未从磁盘读取。(多个进程可以持有指向
- ilock(ip)
- 为ip上睡眠锁,若inode.valid为0,则从磁盘读取inode到ip
- … examine and modify ip->xxx …
- iunlock(ip)
- 为ip解除睡眠锁
- iput(ip)
- 引用次数减1,如果是最后一次引用,且没有链接指向inode,则释放inode(在磁盘上)。itrunc()清理(将文件截断为0字节,同时释放各块)、iupdate()写回磁盘
iput()不会在文件的链接计数降至零时立即截断文件,因为某些进程可能仍在内存中保留对inode的引用。这可能导致磁盘上存在links为0,但却已被分配(type不为0)的文件。xv6没有解决这个问题,可能会导致磁盘空间不足
其它函数
struct inode*ialloc(uint dev, short type):Allocate an inode on device dev.Mark it as allocated by giving it type type.Returns an unlocked but allocated and referenced inodeialloc的正确操作取决于这样一个事实:一次只有一个进程可以保存对bp的引用:ialloc可以确保其他进程不会同时看到inode可用并尝试声明它
bmap(struct inode *ip, uint bn)返回索引结点ip的第bn个数据块的磁盘块号。如果ip还没有这样的块,bmap会分配一个int readi(struct inode *ip, int user_dst, uint64 dst, uint off, uint n):Read data from inode . Caller must hold ip->lock. If user_dst==1, then dst is a user virtual address; otherwise, dst is a kernel address.int writei(struct inode *ip, int user_src, uint64 src, uint off, uint n):Write data to inode. Caller must hold ip->lock. If user_src==1, then src is a user virtual address; otherwise, src is a kernel address. Returns the number of bytes successfully written. If the return value is less than the requested n, there was an error of some kind.- 函数
stati(*kernel/fs.c*:442)将inode元数据复制到stat结构体中,该结构通过stat系统调用向用户程序公开